Application Form & Verification Process
Application Form
The term "Application Form" in CPF means the package contains all the credentialing information for a specific practitioner. For example, Demographic information, Office information, Licensure, Education, DEA, Network participation, Attestation questions, etc. Any one of these elements is called a "Section". A Section may contain multiple records, for example, a practitioner may practice at more than one office, or a practitioner may have more than one license.
In theory, the credentialler should verify every record of each Section. Then the credentialler should input all the verification information together, including paper-based forms, scanned images files, saved primary source files from the web, phone records, final profile or reports, and any other verification related results. One of most important purposes of the CPF solution is that it centralizes and organizes all practitioner information into one single "Application Form".
By using CPF Desktop Client, the credentialler can organize and compile all tasks in one place, including:
- create new application form.
- data entry, update.
- submit application to validate data, rule and logic.
- request for a different "Section" from a different source with different methods, automatically or manually.
- upload and attach external sources for multiple purposes.
- determine what needs verification and perform the verification process.
- perform an audit process (optional).
- dynamically generate application form reports in a required format.
- download an application form package in which all practitioner credentials are well organized. The package is independent and can be viewed and/or edited.
Application Form Overview
Please refer to the sequence from the figure of the "Application Form" module.

Toolbar
Action to current form
- Create Application Form
- Refresh
- Notification
- Send
- Log
- Gap Check
- Submit Application Form
- View Type
- Nav Bar View
- Tab View
Current Application Form information
Lets user know who's application form is presented.
Section

Sections available
- All available sections are listed here.
- The scope of sections is configurable, depending on what the current organization needs and what the current practitioner's type is (DDS, DC, MD, etc.).
- There are two choices for section group, "Tab" and "Navigation Bar". "Tab" is the default and recommended.

Selected record in selected section
- Every field in the record has a ‘label’ and an ‘or’, The ‘label’ shows the name of field, ‘or’ can be a textbox, dropdown list, calendar, masked textbox, button or composited control. Rely on the format of field data.
- If there is no record in the current section, the record form cannot be edited. To add a new record, click "Add New" button in the "Actions" panel.
- All fields are configurable. For example: "if the field is mandatory", "the content of field label", "what kind of ‘or’ should apply to a field", "what kind of format a field can accept (phone, SSN, zip, etc.)".
- The label ends with "(*)" indicating that the field is mandatory.

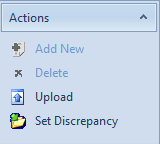
Actions to current record
- Add New; add a new record to the end of the currently selected section.
- Delete; by choosing this action a confirmation box prompt pops up, select "Yes" to delete selected record;
- Upload: user may attach any file as a reference resource to a specific record by this action. After this, the uploaded file will be listed in "Verification Process"->"Source" list, which may be included in the final application form package.
- Set Discrepancy: sets a "Discrepancy" flag for a currently selected field. The tagged field will be listed in "Verification Process"->"Discrepancy". This action acts as an aid in the verification process; it is not required for the process. If you do not know how to use it then avoid it.
Navigate to other records
- Change a selected record by clicking the navagation button (first, last, previous, next).
- Change a selected record by clicking the navagation button (first, last, previous, next).
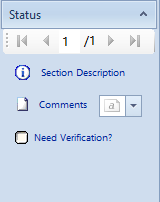
When a section needs verification
- When a section is pre-defined as in need of verification. However, CPF leaves the credentialler the freedom to check or uncheck the "Need Verification" option that allows "no need to verify all of the past information if unnecessary".
- Once "Need Verification" option is checked, the "Verification Process" module is activated.
Summary

Application & Verification Status
Displays the overall application process and verification status:
- "Submitted" -->Application has data entered completely and is ready to be credentialed by Credentialler.
- "Verifying" -->Application is in the process of credentialing.
- "Verified" -->Application is verified.
"Verification Completed" -->Displays a record count of the number of selected records in the various sections requested for verification which have been verified.
"Need Verification" --> CPF has two ways of requesting verification:
- By Organization-wide configuration to set certain sections to be verified.
- By special requirement, credentialler can request record verification by clicking on "Need Verification" The status will show the number of records that have been requested for verification from this application.
The status will show the number of records that have been requested for verification from this application.
(Note: When a record in a certain section requires verification, you need to select the "Need Verification?" box in order to credential that record. See item 9)
Status and summary of every record in every section
- every section and the contained record(s) are listed here ("NO RECORD" for a blank section).
- each record has it's own status, e.g. "Not Submitted", "Submitted", "Created after Submitted", "Verifying", "Verified", which represents a different verification process status.
- includes summary info of a record, and validation info, including "Warning" (yellow icon) and "Error"(red icon).
- move mouse over the message icon (if it exists) to see a validation result.
Source
Manage resources for the current application
- User has the ability to attach any file as a reference source for the current application form.
- Type of source may include "Release", "Signature", "Photo" etc. All of these required types are configurable.
- All the sources listed here can be part of the final application form package.
- User can view, upload or delete these source files.
Generate application form reports in a specific format
- "Format" here means file type (.doc or html) and report type (CPPA, Universal).
- The reports that are available for a specific application form depend on the administrator's setup and type of current practitioner. This allows the admin to customize which report to use. It also means a report for DDS will not be used by an application form for DC.
- The report is generated in real time when the user selects.
Verification Summary
Action to current application form
The following sections describe how to work on the "Application Form" module
Create Application Form!
CreateAppForm.png Organization: your current Organization Group Edit Application Form directly checkbox: if show this Application Form after you click Save button.
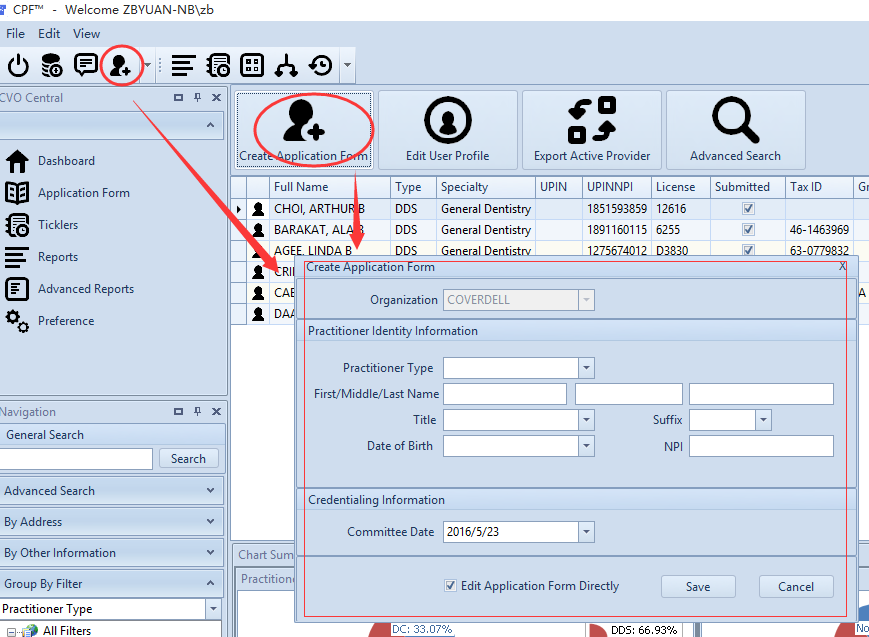
There are two ways to create new application forms:
- Data conversion: Import from existing legacy data source.
Create manually.
The following steps describe how to create an application form manually:
- Select "Application Form" from "Central Panel", go to "Application Form" module. [IMAGE HERE]
- By default, it's a blank form. Select "Create Practitioner" tab at the bottom of the current form. [IMAGE HERE]
- Click underlined "Create New Practitioner" link, all data entries are enabled, enter basic identity information here. [IMAGE HERE] (Note "Organization" dropdown list and make sure the practitioner that is going to be created belongs to the selected organization. Otherwise, the newly created practitioner may "disappear" from the Search and Group filter.)
- User must click the "Save" link button after finishing data entry. "Cancel" clears all data entries and disables them.
- All entered information will be the part of the newly created application form. In fact, they are the basic information of the section "Personal Information". (Note: data entries provide a mask facility so that entered data is kept with the correct format (e.g.; date time format, SSN, phone number, etc.). There are other validation actions to keep data within correct rules and logic. Such as; "must not leave a required field blank", or "DOB should not be later than current date", etc. In this form ("Create Practitioner") and almost all the other sections for data entry, CPF Client will provide a consistent format for these actions.)
Application Form Status
See overview.
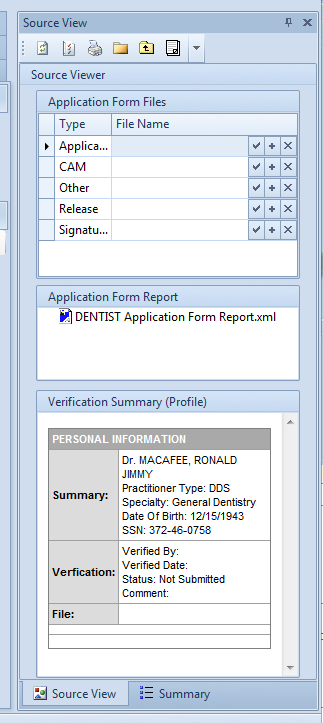
Source Viewer
User can regard the source viewer as a container which contains all the information and sources to generate an overall application form package.
[IMAGE HERE]
- Source viewer contains three parts:
- Application form files; all the files related to a practitioner and his/her application form. Typically, they are: release file, signature, personal photo, copy of application form, etc. All of these items are configurable, depending on what the credentialler may need.
- Application form reports, ad hoc reports for a current application form. What/which reports are required is configurable, depending on the requirements of the credentialler or a committee.
- Verification summary; CPF organizes and generates a list of verification summary information. All the sections and records which have been verified are listed here. All the source files related to each record are linked to the proper record in this list.
- Actions to the application form in source viewer (refer to the description of the toolbar in above figure)
- Refresh source viewer to retrieve real-time data, source files and status;
- Generate an application form package. The package (in a ".zip" file) contains everything listed in the source viewer. All the data, files and status are composited into an xml file (PackageCatalog.xml). Once the package has been generated the user may deliver it to others who do not require a CPF client. Un-zip the zip file and open PackageCatalog.xml and a web browser will exhibit everything in one page.
- the structure of the package looks like this: [IMAGE HERE]
- the profile catalog looks like this: [IMAGE HERE]
- Publish package; credentialler can perform this action to publish the package to a web site for download.
- View all contents in the package sequentially, including image, html, doc, pdf and so on.
- Locate the package folder; the user can open the local folder where all the files related to the current application form are filed.
- Check log of package; list log for the package(s) that have ever been published;
Submit Application Form
Most application form data in CPF are transferred from a legacy system. However, on occasion, the user will need to create a new application form. After creating a new application form, the user is responsible for transferring the necessary data in the application form into the CPF system by input, attaching, importing and organizing, section by section, and/or record by record. If all the necessary data has been prepared, the user may "submit" the application form. "Submit" action means "all necessary data is ready and anyone may verify Information about "Submit" and the corresponding effects:
- Submit means "data prepared", it occurs only once. Any updates to the application form after "submit" are regarded as "changes that must be recorded", and may effect the verification process. [IMAGE HERE]
Submit action does do some useful things. The most important one is validation. For example:
- Check every record in every section to validate data. The validation result may be a "warning" or "error". An "Error" message usually means important info is missing (e.g. name of practitioner) or breaking an important rule. "Warning" means there are issues, which may be a missing field or logic error. The figure below shows a warning message when submitted:
[IMAGE HERE]
Note: for "warning" message(s), the user is able to ignore them by clicking "OK" button. Or by clicking "Cancel" button to stop the submit process in order to correct these issues.
- Check every record in every section to validate data. The validation result may be a "warning" or "error". An "Error" message usually means important info is missing (e.g. name of practitioner) or breaking an important rule. "Warning" means there are issues, which may be a missing field or logic error. The figure below shows a warning message when submitted:
[IMAGE HERE]
Another check is for a missing section. In some case, there is no information known about some sections. CPF will check which sections in the application form have no record at all. Then list all of them to the user and the user can provide comments to explain or ignore this warning. As the figure below shows: [IMAGE HERE]
- There's another validation for checking an education gap. This is the rule: if the gap(s) between serials of education experience is larger than a specific time span, the practitioner will need to explain the gap(s). The "serials of education experience" include "pre-medical education", "medical education", "internship", "fellowship" and "residency". The "specific time span" is defined at menu of "Options"->"Others"->"Max Gap Days". User can change this number as need. Or user could ignore this check by changing "Max Gap Days" to a zero.
- If all validation has passed (or ignored), the application form is submitted. The status of an application form and each record will change from "Not Submitted" to "Submitted".
[IMAGE HERE]
Note: only if application form is submitted can the verification process start.